Legend of Grimrock
Level 7Ancient Chambers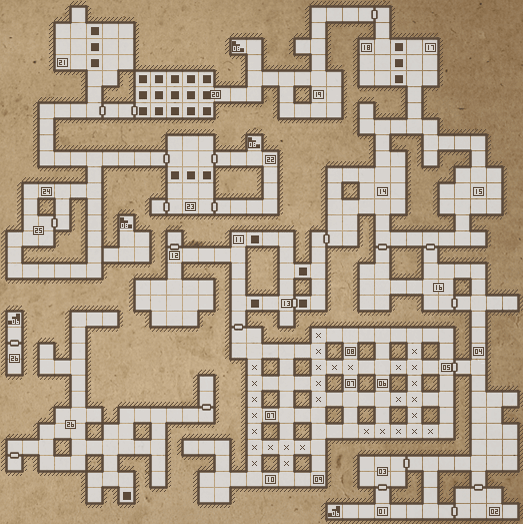 1 - Arrival The Ancient Chambers are one of the more straightforward levels, but no less interesting. The hall you begin in has several doors within it, although many can only be opened from one side. Shortly, you'll encounter Green Slimes. If you didn't already visit the Slime Dungeon on Level 4, then you'll learn that they're slow-moving but tough enemies that can absorb a lot of damage. Their real threat is their ability to inflict the Disease status effect, which prevents healing and regeneration. You can use an Antidote potion to cure it, or wait for the character to heal up naturally if you prefer. 2 - Toorum's Note #6 & Secret Check underneath the Tattered Cloak on the floor here to find one of Toorum's Notes. Read it to learn of a secret - a hidden chamber accessed by opening all the doors but the one "where the draft is strongest." In reality, this means you'll need to open all the doors in the immediate area except the south door at room (3). Doing so will cause the wall in this room to slide open, revealing Ring Greaves, a Battle Axe and three Throwing Knives. 3 - Supplies There's a Tar Bead and Grim Cap on the floor of this room. 4 - Collapsed Tunnel 5 - Maze of Shadows & Toorum's Note #7 The Maze of Shadows is, as its name implies, a puzzle involving light and darkness. In the maze, there are several Torches on the walls, and you will need to avoid going near them to get through. If you step the wrong way, you'll be teleported back to the entrance. Shortly into the maze, on the north side, you'll find another note from Toorum explaining how the light "plays tricks" on him. 6 - Scroll of Darkness This scroll provides you with the Darkness spell, which will envelop you in shadow and dispel any Light spell you have active. This can be useful in certain situations, like when hiding from monsters. You can use the Darkness spell to more easily spot the lit sections of the maze, but you should be able to manage without it if you don't have anyone capable of casting the spell. 7 - Slime Bells Check the floor here for Slime Bells. There's one at each location marked on the map. 8 - Hardstone Bracelet Check the shelf in the wall here for a Hardstone Bracelet. This magic item provides a boost to Attack Power in exchange for longer attack times and cooldowns, a trade-off you may agree with or not depending on your style. 9 - Wooden Box & Hidden Switch Search here for a Wooden Box containing a bunch of food supplies (Herder Caps, Baked Maggot, Pitroot Bread, Boiled Crab Beetle, Mole Jerky). Just nearby, there's a hidden switch on the wall which will give you access to the portal at (10). 10 - Portal & Secret Areas You can only access this portal using the hidden switch at (9). Stepping inside takes you to a secret area with a couple of Small Herders to kill. You'll find two Throwing Axes and two Crossbow Quarrels, plus some Mole Jerky. That's not all! Search the walls in this room for a runic symbol. Press it, and you'll open the wall to the other side of the portal, where you'll be able to collect four Frost Bombs. 11 - Pits, Lock & Secret There are a couple of floor pits here that prevent you from crossing. You'll have to retrieve the Iron Key from (12) to raise the platforms. Note that there are a lot of Uggardians in this area, so keep on your toes. The pits in the floor make them a bit awkward to fight directly - using Ice Magic to freeze them in place can work very nicely. There's an easy secret here. Fall down the south pit and you'll end up in a small chamber below. Grab the Bracelet of Tirin from the cubby-hole in the wall for quicker cooldowns. 12 - Slime Ambush & Iron Key The wooden door here can be opened by pressing the floor switch in the room to the south. Doing so will reveal a sole Green Slime, and the Iron Key for (11)... but be careful. A few seconds after, the walls in the south room will open to reveal several more Green Slimes. Try to retreat to the hallway and use it as a choke point to avoid being overwhelmed by green goop. When they're all dead, grab the Iron Key and search the south room again for a Boiled Crag Beetle and the Diviner's Cloak, a nice Mage-oriented piece of gear. 13 - Gate & Spectral Orb Puzzle This puzzle is rather interesting. Press the switch on the wall to fire off one spectral orb going north-south. Dodge quickly out of the way, but then as soon as the orb passes, a second orb will be fired off east-west. Dodge that one so that it reaches its destination past the gate, and you'll be able to proceed. 14 - Green Slime Room There are a ton of Green Slimes in this room to fight through. When the carnage is over and the walls are painted with goo, be sure to search the floor for a spare Throwing Axe. 15 - Crystal of Life & Fire Torc At last, the Crystal of Life! You will probably have to battle through a horde of Green Slimes to reach it, unfortunately. In addition, there's a Fire Torc on the floor of the Crystal's room - a necklace which provides a significant bonus to the wearer's Resist Fire stat. 16 - Spectral Orb Puzzle Room, Secret & Toorum's Note #8 There's another puzzle dealing with spectral orbs here. You'll need to press one switch to fire the orb, and then the other to open the gate. The easiest way is to go back and forth across the switches quickly, such that the gate doesn't close entirely before opening again. Your reward for completing the puzzle? First, a fight with three Uggardians... second, some new items! The Shaman Staff, found on the shelf behind the gate, is a useful piece of kit for any Mage, and the Scroll of Invisibility will teach you an Air Magic spell that will allow you to evade enemies. Last, in the new room that's opened up, you'll find yet another note from Toorum, containing his thoughts on Grimrock's keepers. 17 - Portal & Secret This portal takes you to (18). The basement below this area is more interesting than the room above. There's a long hallway with buttons all over the floor. Stepping on the buttons releases poison bolts from the far end of the hall. To return, you'll need to quickly and carefully navigate the switches, avoiding as much damage as possible. The ideal way to minimize damage is to navigate from right to left and back right again, timing your movements to dodge the incoming fire. Don't be surprised if you lose a party member or two here. Your reward for success are the Boots of Valor! To return, you'll need to flip a lever on the east end of the basement. Doing so will release a Giant Spider and a few Cave Crabs, however. If you're quick on your feet, you can try using the poison traps against them, though it's probably easier to just beat them up hand-to-hand. 18 - Portal This portal takes you to (21). 19 - Lever Puzzle & Assassin's Dagger A powerful dagger is hidden in this area. There are five levers in the room - three of them will make a "click" noise when pulled. Flipping all the ones that click so that they are arranged up, down, up, down, up, will retract the walls to reveal the Assassin's Dagger, one of the best Dagger-type weapons in the game, both for its high damage and life-stealing property. 20 - Pit Puzzle This puzzle is a bit tricky. The demon statue fires off spectral orbs continually, and when they reach the sconce on the wall, the platforms either drop or raise themselves. The door at the end of the chasm can be opened by pressing a hidden switch in the northwest corner, but you'll have to do so carefully, by timing your movements to block the spectral orb when the statue fires it, otherwise you'll fall below. Annoyingly, opening the door will release two Uggardians, who you'll have to fight either from afar or while standing on the platforms. Before moving too far on, turn around to examine the pit area from the other side - you'll see a small shelf on the opposite wall with an item in it. Carefully navigate your way over there and retrieve the Bracer of Fortitude, a bracelet that increases Strength and health regeneration, but also increases food consumption. In the basement, should you happen to fall, you'll have to fight an Ogre and a couple of Giant Spiders. They shouldn't be too much threat at this point in the game, as you have plenty of room to move. Search the room when they're dead for a Heavy Shield, Milkreed, and Crossbow Quarrel. 21 - Portal This portal gives you access to a Sack full of alchemy ingredients: a Tar Bead, two Blooddrop Blossoms and a Flask. The portal itself takes you back to (17). 22 - Skull & Stairs Down A free Skull sits here waiting for you. If you have a Minotaur with Head Hunter trait, enjoy the damage boost. Congratulations, you've reached the end of Level 7! Time to move on to Level 8: The Vault. There are a few more secrets to find, including an Iron Door (23), if you wish to continue exploring. 23 - Iron Door Level 7's Iron Door is an interesting one to open. When you enter this room, the demon statues will start spitting spectral orbs forward towards the receptacles on the other side of the room. If one of them reaches, you'll be teleported out of the room instantly. Your goal is to sidestep and block all of the spectral orbs in sequence. Doing so isn't especially difficult, but it does require fairly quick reflexes. You're free to retry as often as you wish. Success means opening the Iron Door. Take a moment to pat yourself on the back before grabbing the Chitin Boots (the last piece in the set) and the Scroll of Enchant Fire Arrow inside. 24 - Hidden Stairs At this location, you'll find a rune symbol on the hallway wall. Press it, and a wall to the east will slide open, revealing a hidden staircase down to Level 8 (D). This is an alternate entrance, and provides access to the Dismantler's Vault area on Level 8 (B), the only way to get one of the most powerful weapons in the game. 25 - Flail Search this room for a Flail, a Mace-type weapon that's slow and inaccurate, but powerful. While you're here you may come under attack by an Uggardian or two. You can also find some Milkreed in the hallway to the south. 26 - Basement Tunnels & Fighter's Challenge These two areas are only accessible from Level 6. Please see the Level 6 walkthrough page for more details. |
DonateIf you like our walkthroughs and want to support us to continue expanding this into more detail and perhaps other games, you can donate to us. We would greatly appreciate it. |