Legend of Grimrock
Level 8The Vault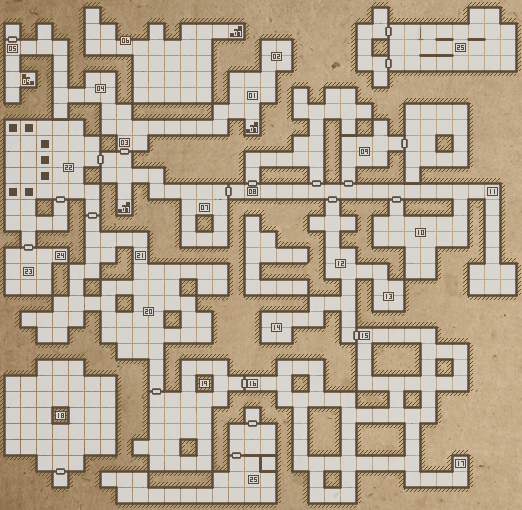 1 - Arrival & Scroll of Shock Shield The Vault is so named for The Dismantler that resides deep within it, the game's most powerful Sword-type weapon. The only way to access it is to use a secret entrance (C) on Level 7. The vast majority Level 8 is actually optional, but to get the weapon will be well worth it for some players. First things first, grab the scroll on the wall shelf nearby to learn the rune combination for Shock Shield, a useful spell in the depths as you come across more enemies with Air Magic capabilities. There's also two Cave Nettle plants nearby for the budding alchemist in your party. 2 - Blueberry Pie Yes, there's pie in the depths of Mount Grimrock. Search the wall just near the entrance to the level for a hidden switch, and press it to reveal a room with a lone Giant Spider in it. Defeat it, and then grab the delicious treat from... near the clutch of disgusting spider eggs. Yummy. There's also Milkreed and a Grim Cap in this room, but why bother when you have pie? 3 - Vault of the Dismantler Exit Gate The Dismantler, as mentioned back at (1), resides behind this gate. To get in, you'll have to use a secret entrance on Level 7 (C). See (6) for more details on the Vault area itself. When you're done with finding the weapon, you can return by flipping the lever on the wall inside to lower the gate. 4 - Crystal of Life & Note You'll probably find yourself running back to this Crystal of Life a few times as you explore the Vault. There's a note on the floor through the bars just nearby with a drawing scribbled on it. If you can't piece it together, it shows the location of the secret door to get into the Vault, up on Level 7. 5 - Iron Door, Stairs Down & Helmet of Valor Another massive Iron Door guards a secret treasure here. To get in, you'll need another Gear Key hidden at (11), inside the Vault proper. Once you've retrieved the Gear Key, the Iron Door will surrender its secret to you: the Helmet of Valor, one of the best helms in the game, and four Frost Quarrels. In the nearby alcove you'll find some spare Cave Nettle, and just beyond the Iron Door there's the stairs leading down to Level 9 (B). Feel free to go on ahead if you're not interested in picking up the Dismantler, although the fame and fortune are probably worth the risk. 6 - Dismantler Vault Arrival Now this is more like it. The Dismantler's keep is massive, full of puzzles, traps and enemies. This is actually one of the largest levels in the game, and it's entirely optional... but the loot and experience are useful for any party. 7 - Lightning Conduit Entrance & Ambush As you walk along here, a hidden door will open to reveal an Ogre and an Uggardian. They'll pin you inside the south roundabout, so be prepared to move quickly to avoid both of the enemies. The Ogre is the bigger threat, so try to run from it and take out the Uggardian first. Once the ambush is finished, push the newly-revealed switch on the wall to open the gate to the Lightning Conduit (8). 8 - Lightning Conduit West The Lightning Conduit is a long hallway that continually fires off a lightning bolt every few seconds. Suffice to say, it's dangerous. Start by running to the first gate on your left and pull the chain to open it - back off and then run inside on the second pass. An Uggardian may come out, although he will likely be obliterated by the lightning bolts if he's feeling stupid. Continue down the hallway (checking the floor for a Baked Maggot on the way) until you come to a wooden door. This is your next objective. To open it, take the north hall and look for a lever to pull. There's a cluster of three Shock Bombs available for you nearby - lightning of your own. 9 - Lightning Conduit East & Secret Back in the main conduit hall, it's the same drill again - pull the chain to open the nearby gate. Inside the next couple of rooms, you'll have to battle through a horde of Giant Spiders and an Uggardian... a typical encounter at this point. When it's clear, use the lever in the second room, on the middle column, to open a wooden door to the south (10). Before going too far, turn your attention to the walls in the pair of north rooms. There are three semi-hidden switches on them, one in the first room (behind a clutch of eggs) and two in the second. These switches will cause three small alcoves to open, with floor switches in each. Hold them down with any random objects you might have, and the walls in the east room will open to reveal Plate Gauntlets and Plate Boots. 10 - Lightning Conduit South & Secret Switch Yet more Giant Spiders and Uggardians await you in here. When they're all dead, it's business as usual - look for the lever on the wall to open the central conduit door (12). Of course, that's not all. Check the south chamber for a hidden switch on the wall - this opens up another hidden door into the conduit, allowing you save and easy access deeper in. From there, step out quickly and look for another hidden switch in the hall just to your left - it'll open another hidden door over at (11). 11 - Conduit's End & Secret The end of the conduit contains a small alcove with three Lightning Bombs... but if you push a hidden switch to the west inside the conduit hall, you'll open a hidden door next to the demon statue. Inside the secret room, you'll have to contend with a single Ogre in close quarters. Deal with the beast (backstabbing and strafing around it works well), and then turn your attention to the loot: a Lightning Rod (enchanted wand that fires lightning bolts) and the Gear Key needed for the Iron Door (5). Great! 12 - Hallway Finally, free from lightning and thunder! Unfortunately, there are more Giant Spiders and Uggardians to get through here. When they're dead, continue on south. 13 - Throwing Axes Plunder this room for three Throwing Axes, should you need them. 14 - Toorum's Note #9 & Frost Arrows Check this room for more of Toorum's musings (in note form) and two handy Frost Arrows. 15 - South Tunnels These tunnels are crawling with Uggardians and Ogres. You're in for a difficult and grueling fight. If you have trouble with the Ogres, you can use the long corridors to tempt them into charging, giving you an opening to attack. Keep your eyes open on the way for three Tar Beads, Pitroot Bread, and two Lightning Bombs. Your goal is located at (16), but you'll need to make for the portal at (17) before you can proceed too far. 16 - Locked Door This door is shut tight. You'll have to retrieve the needed Brass Key from (17) before proceeding. 17 - Portal This portal takes you to (18). Prepare for a difficult fight against a legion of Herders! 18 - Herder Battle, Skull & Keys Accessed from the portal at (17), this large room is crammed full with Herders of all shapes and sizes. Keep moving quickly and attack from afar to avoid getting surrounded and caught up in the poison clouds they leave behind. When they're all dead, loot the room for three Milkreeds, two Throwing Axes, and a Skull. Then, turn your attention to finding two Brass Keys in the room - one is on the floor in the northeast corner, while the other is on a shelf in the room's central pillar. You'll use one to open the gate to the exit portal, and the other is for the locked door at (16). 19 - Floor Switch Room & Ambush To get through the door up ahead, you'll need to press all the floor switches in the area down. Use spare objects like Rocks and Torches (although don't use all your Rocks, as they're needed for a secret later on). Prepare for battle when you press the last switch - the central wall will retract to reveal three Giant Spiders and an Uggardian. Survive the assault by staying mobile, then flip the newly-revealed lever to open the way forward. 20 - Uggardian Hall This large chamber is full of Uggardians, so use whatever fire resistance gear or spells you might have to deal with them. After they're all dead, you can search around to find a Leather Cap, two Shurikens, a Knife, a Grim Cap, Pitroot Bread, and some Mole Jerky. Take note of a hidden switch on the west-side column in this room - it'll open a secret stash at (21). Another hidden switch near the north gate will do the same job. 21 - Secret Pass Press the hidden switch on the side of the west column at (20) to reveal a small passage into the next area. Inside you'll discover a Wooden Box with two Throwing Axes and three Crossbow Quarrels inside. 22 - Lightning Room Prepare to meet the most annoying Giant Spider in all of Mount Grimrock. This twerp runs back and forth across floor switches on the other side of the gap, and each time it moves, it triggers the statues on the walls to fire lightning bolts. You'll need to strafe and follow it around, pelting it with ranged weapons (there are plenty in the previous rooms) in order to kill it. Using a Shock Shield spell can make this challenge a bit easier, but it's still a little frustrating if you don't have a ranged specialist. When the creature is finally dead and you're more or less safe, use the lever on the nearby wall to open the gate back to the Crystal of Life (4). When any healing business is settled, return and look for two hidden switches on the walls of the room. Pressing both will open the gate to the south. The lever on the other side will raise a platform, allowing you to retrieve your thrown weapons. Before moving on, take the plunge down the pit. You'll end up in a basement level with a Giant Snail, two Throwing Axes and some Pitroot Bread. At this point in the game, food can start to get scarce, so stock up while you can! 23 - Vault of the Dismantler Here it is in all its glory: the Vault itself. Isn't it beautiful? As the text at the entrance reads, "thieves beware." This is both a warning and a clue. The pedestal the Dismantler rests on is pressure-sensitive - taking it means near-instant death at the hands of lightning traps. To avoid a messy end, grab the Torch from the nearby wall sconce and place it on the pedestal. Grab the Dismantler once you've done so, and claim the most powerful Sword-type weapon in the game as your own! You're now done with this level... almost. Search the southeast corner of the room for a hidden switch revealing one of the game's Treasures, the Golden Dragon (24). When you're done, you can continue on to (B) and proceed to Level 9: Goromorg Temple I. 24 - Golden Dragon The Golden Dragon rests here, its resting place opened by pressing a hidden switch at the southeast end of the room. A magic sword, and treasure? Of course this was worth the effort! 25 - Basement Rooms These areas must be accessed by falling down pits from Level 7. |
DonateIf you like our walkthroughs and want to support us to continue expanding this into more detail and perhaps other games, you can donate to us. We would greatly appreciate it. |