Legend of Grimrock
Level 12The Prison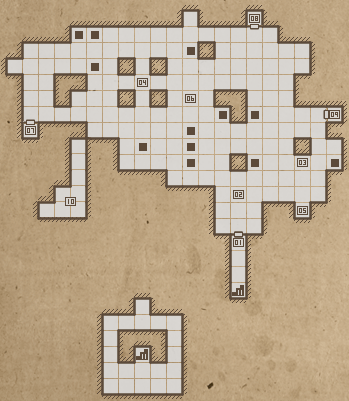 1 - Arrival & Prison Door A brand-new tileset, a dingy, rusty metallic look, awaits you for the final levels of the game. You'll be able to reach The Prison midway through Level 10, but the door is sealed and you'll need the Prison Key to open it. You can find the Prison Key back on Level 10. When you have the Prison Key in hand, use it with the lock. You'll immediately be contacted by the voice in your dreams, which no longer has to wait until you're asleep to speak to you. Of course, if you haven't rested at all during your stay in Mount Grimrock, this will probably come as a bit of a surprise. In any case, when it's done talking, proceed through the door. Your instructions from the voice are to "find the mechanism." 2 - Prison The main hall of the Prison is a large open area filled with pits, and inhabited by Goromorgs. Make your way towards (4) to the northwest. 3 - Scroll The scroll located here serves as a warning... but who, or what, is imprisoned here? 4 - Mechanism & Wardens As you approach, you'll encounter four massive iron golems. These are Wardens, the strongest enemy you'll fight in the game. In terms of general behavior, they resemble Ogres, as they both have a powerful charge attack and can attack their sides as well as their fronts. Your best bet is to lure them out one at a time and destroy them individually - any more than one will likely be too much to handle. When the Wardens are dead, approach the mechanism you'll hear the disembodied voice again. It explains that the keepers of Grimrock destroyed the Mechanism in order to close "the Portal," but if the Mechanism could be repaired... is this a way out of the dungeon, at last? Your task is clear: retrieve four missing pieces and repair the Mechanism. All of those pieces are on the lower floor, Level 13: The Cemetery. There's only one way to get there - jump down one of the many pits on Level 12. Please continue reading over at our Level 13 page for more details on how to find all the components. When you return with all the components in hand, place them in the following order: East side: Bladed Gear North side: Orb West side: Steel Gear South side: Infusor A word of warning - placing all the machine parts in their places will shut you off from the rest of the dungeon, and triggers the endgame. If you have any errands to attend to, remaining secrets to find, etc., do so now. With that, you've... wait, what? No! It turns out that all along, the creature speaking to you in your dreams and guiding you forward was the very mechanical monstrosity that was shackled away in Mount Grimrock ages ago in the first place! You've just unleashed it once again into the world! At this point, the machine will burst free from its shackles and begin trampling towards you - if it lands on top of you, you'll die instantly. Complicating manners, all manner of monsters will begin to spawn. Back off quickly - there's nothing you can do for now. But, remember the machine mentioning a portal? A new one has appeared after reactivating him - head as quickly as you can to (5) and step through. 5 - Portal Mercifully, this portal will take you away from the Cube. Before long you'll find some stairs. You know, sometimes a strategic retreat is the best option! Climb up the stairs and continue your escape on Level 11: The Tomb. 6 - Undying Battle This is it, the final fight of the game, and your last shot at freedom! The Undying, the huge mechanical cube intent on destroying you, must be dismantled again piece-by-piece. With the Weapon of Power under your belt, you're sure to succeed. This battle isn't actually too difficult - it's more of a puzzle than anything else. The Undying can only attack you by crushing you, and while that's dangerous, it's actually the pits and the other enemies in the room that serve as a bigger liability, as they're likely to leave you cornered and easily crushed. The enemies will continually respawn, so you'll just have to put up with them. To actually beat the Undying, you'll need to fire the Weapon of Power at it. Doing so will disable it for about 10 seconds, leaving it helpless. From there, you'll need to find the components you placed in it back at (4) and literally tear them out. They haven't changed, nor have their places, so just grab them by clicking on them and tear them out. You'll only have enough time to remove a single component each round, so be sure to put some distance between yourself and the Undying before it comes back to its senses. Once all the components are removed, the Undying becomes vulnerable to regular damage again. Use Bombs and other ranged weapons to greatest effect, as well as the Weapon of Power, because it's still capable of instantly killing your entire party. The Undying is weak towards any sort of electricity-based attacks, so Air Magic specialists will have an advantage. During the fight, enemies will periodically drop more Prison Keys. These can be used to open the doors marked at (7), (8) and (9), which contain some supplies that could help turn the tide. Eventually, after enough punishment, the Undying will be put out of commission, and explode into a thousand pieces. Congratulations, you've escaped Mount Grimrock, and saved the entire land from the threat of the Undying! Enjoy the outro and credits sequence! 7 - Supplies This door can only be opened with one of the Prison Keys that drops during the Undying Battle (6). This one contains a Lightning Rod. 8 - Supplies This door can only be opened with one of the Prison Keys that drops during the Undying Battle (6). This one contains four Healing Potions. 9 - Supplies This door can only be opened with one of the Prison Keys that drops during the Undying Battle (6). This one contains four Lightning Bombs. 10 - Level 11 Basement This area is only accessible from Level 11. |
DonateIf you like our walkthroughs and want to support us to continue expanding this into more detail and perhaps other games, you can donate to us. We would greatly appreciate it. |