Legend of Grimrock II
Cemetery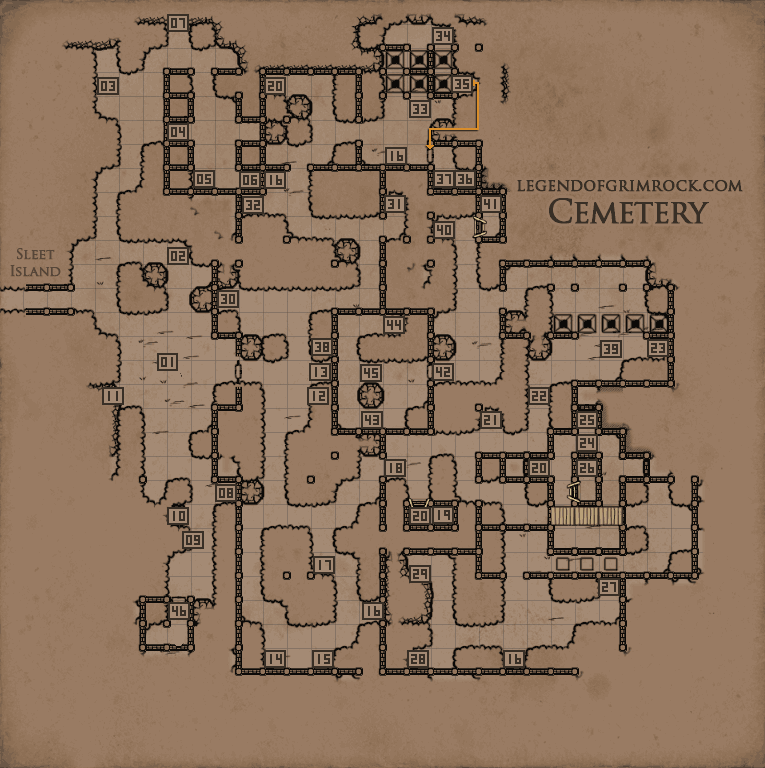 01 - Gate Puzzle As the statue head at 11 indicated, the solution to this puzzle is found in the archives at 25 You will find 3 letters there pointing: North, West, South, North and North. S, in order to open the gate, move the block in the directions given, but after each direction, push the block back to the center, so: - North and back to center - West and back to center - South and back to center - North and back to center - North and back to center 02 - Grave Pummelface the Stonemason No treasure buried (just a zombie). 03 - Grave Tarael Felltree No treasure buried (just a zombie). 04 - Crystal Flower 05 - Grave Three unknown slaves were laid to rest here. Freedom at last! Buried treasure: Antivenom (1) 06 - Treasure Chest Requires Lockpick Contains: Pellets (30) 07 - Statue head Knowledge flourishes on the island. Decay and death have fed its growth 08 - Grave Canmon the Ironwill Buried treasure: Antivenom (1) 09 - Gold lock Requires Gold Key Unlocks Boneblade 10 - Boneblade Requires Gold key to access. 11 - Statue head The orders came and the gates closed. 12 - Hub key gate Requires cemetery hub key 13 - Hub teleporter Teleports you to and from the Hub 14 - Grave Canmon the Ironwill Buried treasuer Healing potion (1) 15 - Grave Haaro the Scribe No buried treasue but an angry zombie 16 - Blooddrop Cap 17 - Broadhead arrow (2) 18 - Grave Ludiar Munmunfar Buried Treasure: Leather Gloves 19 - Shovel, Smoked Sea Bass 20 - Falconskyre 21 - Grave Jakon Riddle No buried treasue but an angry zombie 22 - Grave Rangel Fjordwalker Buried Treasure: Skull 23 - Grave Nameless Buried Treasure: Sack, containing Bread, Cheese, Burrow Rat Shank 24 - Trenches Entering the trenches causes 3 zombies to appear from the ground. 25 - Sack Contains: Bread (2), Horned Fruit 26 - Teleporter/Gate Puzzle In order to open the gate to the east, you need to step on the plate and throw an item into the gate that opens. The opening of the gate seems random and you need to be successful with all 3 teleporters at once. If you fail, the items you've thrown will be returned on the square behind you. Best way to solve this is to look to the middle gate (the one in the north) and make sure your speakers or headphones are set up in stereo, so you can hear the gate opening on the left or right, so you can easily make the turn. 27 - Grave, Blackmoss(1) Ronar Riddle Buried Treasure: Sack, containing Bread, Cheese, Burrow Rat Shank 28 - Recipe: Necromancer's Potion 29 - Statue head Every night the silent one sees something. Look where he looks and be patient. 30 - Grave An unknown shaman lies here. Buried Treasure: Frost Bomb (1) 31 - Grave Kalma Buried Treasure: Pellets (8) 32 - Grave Miriel Riddle No buried treasue but an angry zombie 33 - Rotating pit puzzle The buttons make the closed (safe) pit move once in a clockwise direction. There are 2 of these closed pits, it's impossible to identify them by looking at them, only by flipping the switch you see which one moves. The key to understanding how the pits move is as follows: the switches in the west control one pit, the switches in the east control the other pit. If you have to make the switch while standing on a pit, make sure you're not standing on a pit that's moved by that side. 34 - Grave Basahn of Xafi No buried treasue but an angry zombie 35 - Switch This switch does 2 things, it opens the gate to the Power Gem and below in the Wormbound Catacombs, where you fall down into from these pits, it will close the open door to the teleporter on one side and on the other side, it will open it. So you need to do this puzzle again from the other side, and you can't cheat by just dropping down the pits and taking the elevator back up. 36 - Power Gem 37 - Sack, Falconskyre Sack contains: Scroll of Lightning Bold, Antidote, Hub key 38 - Sign The Hub. 39 - Pressureplate puzzle Pressing the button in the east will cause a spark to fly from east to west on the other side of the pite. It will need to fly into the receptacle. There are big urns in the way that need to be destroyed. Fire ranged weapons at them or spells. There's one set of urns you cannot reach. For this there is the pressure plate. This switches the teleporters. Stand to the right of the pressureplate Across is where the teleporter would be if the plate is pressed. Fire a projectile to it, quickly step onto the pressure plate, so the projectile flies into the teleporter making it turn to the left. Quickly step off the teleporter to turn the other teleporter on. The projectile will again change direction, into the last urns. Repeat this if the urns aren't destroyed yet. Once destroyed, press the button and one pit will close so you can pass. 40 - Ethereal Blade 41 - Skull, Note Entering this tile will cause a zombie to rise from the dead behind you. The note says: There is a fountain with an ancient oak by its side. From the oak, take four steps to the east and then two steps to the south shall you stride. The treasure now lies beneath your feet. 42 - Gate to the Crypt 43 - Blackmoss 44 - Round Shield, Machete, Sign ~Legend of Kilhagan~ 45 - Entrance to Wormbound catacombs 46 - Exit from Orul's Crypt Exit can only be opened from the inside. |
DonateIf you like our walkthroughs and want to support us to continue expanding this into more detail and perhaps other games, you can donate to us. We would greatly appreciate it. |