Legend of Grimrock II
Tomb of RitesPyramid of Umas Level 2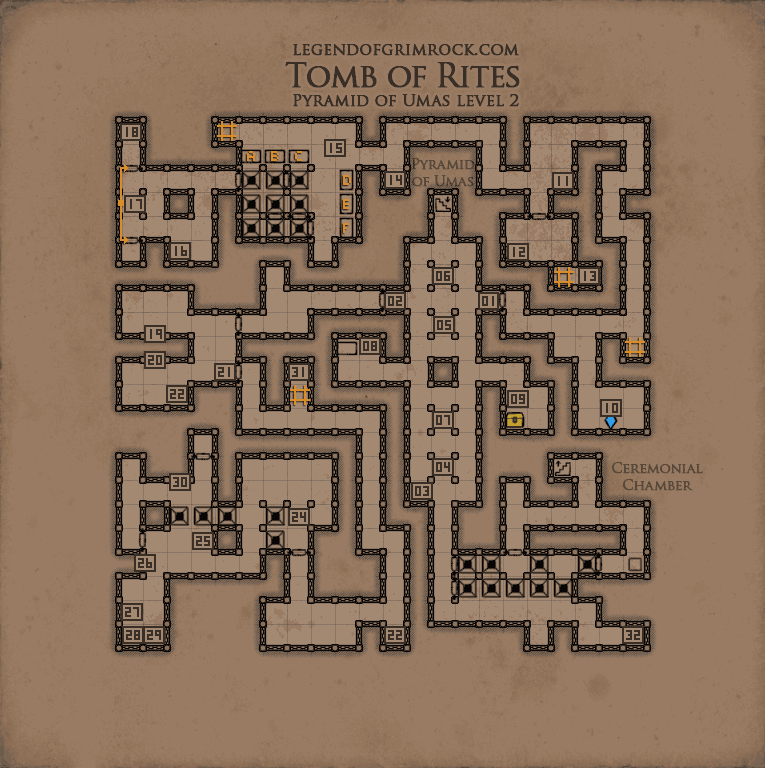 01 - Sign Tomb of Offerings 02 - Sign Tomb of Sacrifice 03 - Bread 04 - Hidden trigger There are 4 hidden triggers in this room, you will hear a trigger sound when stepping on them. You need to step on them in the right order. Start here, then go to 05, 06, and finish with 07. When done successfully, the hidden walls indicated on the map will open, releasing some snakes and mummies. 05 - Hidden trigger 2nd trigger in the sequence 06 - Hidden trigger 3rd trigger in the sequence 07 - Hidden trigger 4th trigger in the sequence 08 - Scroll x x west x four x x Cemetery entrance 09 - Treasure Chest Requires Lockpick Contains: Sickle Sword 10 - Crystal of Life 11 - Poison Bomb (2) 12 - Burul the Hedonist's Tomb Remember the Mirror Gauntlets you picked up at the Pyramid of Umas at 30? Put them on his grave to open the wall in this tomb for a secret room. 13 - Potion of Vitality, Bread, Cheese, Lizard on a Stick, Salted Sausage, Blueberry Pie Grants the achievement "Piece of the Pie" 14 - Blooddrop Cap 15 - Offer Room Puzzle To cross here, you need to flip the switch to open the door, but walking across isn't as easy. You need to find the right combination of putting items on the tables. We've marked the tables A to F on the map. Put an item on A, then on B, then on C. Then put an item on E and F. Move onto the pits and walk to the other side of B. Take the item from the table, you can now reach the switch and the door. Put an item back on B if you want to be able to walk back later. This combination works for the starting position. If they're not in the starting position, you will need to figure out what each table does. In essence each table switches the pits that are in a straight line with the table. 16 - Cannonball (4) 17 - Tomb Key Required to open the teleporter to the Barren Desert located in the Ceremonial Chamber upstairs. Picking up this key will open the doors to your left and right, unleasing some enemies. It will also open all the movable walls indicated inside the tomb of offerings, indicated on the map . 18 - Pearl Shield 19 - Sign Guardian of Moon 20 - Sign Champion of Sun 21 - Door To open the door, you need to honor the guardian of moon and the champion of sun rooms. Remove all torches from their holders in the Guardian of Moon room and put torches into all the holders of the Chamption of Sun room. You may be one torch short, but just go back, there are many torches throughout the whole level or the level below. 22 - Pellets (10) 23 - Unused/Obsolete This number is no longer on the map due to an update. 24 - Fireball puzzle There's also a fairly large area with a great weapon to scout that can only be reached by falling through these pits. Feel free to do so. Look closely at the path of the fireballs, you can see where it goes and also where it's safe to avoid getting hit. Your destination is at the 25 - Stand here When you face north, you see another serpent door. Use the serpent staff that you used to open the Pyramid to open it. You will see another receptacle that expects the fireball to go in. Turn to your left and go to the secret button at 26 where the fireball hits the wall. 26 - Secret Button Pressing this button will cause a teleporter to appear that changes the direction of the fireball, into the receptacle. This will open the door and the movable wall on your sides. 27 - Scroll Three steps x and south from x x 28 - Blackmoss 29 - Archmage's Scapular 30 - Tomb Key Required to open the teleporter to the Barren Desert located in the Ceremonial Chamber upstairs. Picking up this key will open all the movable walls indicated inside the tomb of sacrifice, indicated on the map. 31 - Lizard on a stick 32 - Lizard on a stick, Lockpicks (1) 33 - Teleporter Puzzle You see a moving teleporter here, and a static one in an alcove in the south wall. Stepping through the teleporter in the south wall will bring you to where the moving teleporter is now. Wait for the teleporter to be the tile without a pit. The tile most eastward, then step through the teleporter. Face east and fire the serpent staff at the serpent door. (Make sure there's no teleporter in between) This will open the door. The teleporter will probably have picked you up and returned you back to the other side. Go back to the same spot and now throw an item onto the pressure plate. This will open the door that can be reached by stepping through the teleporter when it arrives on the other tile. Feel free to fall down the pits, there's a lot to explore there, which can only be reached from here. 34 - Power Gem |
DonateIf you like our walkthroughs and want to support us to continue expanding this into more detail and perhaps other games, you can donate to us. We would greatly appreciate it. |