Legend of Grimrock II
Crystal Mine Entrance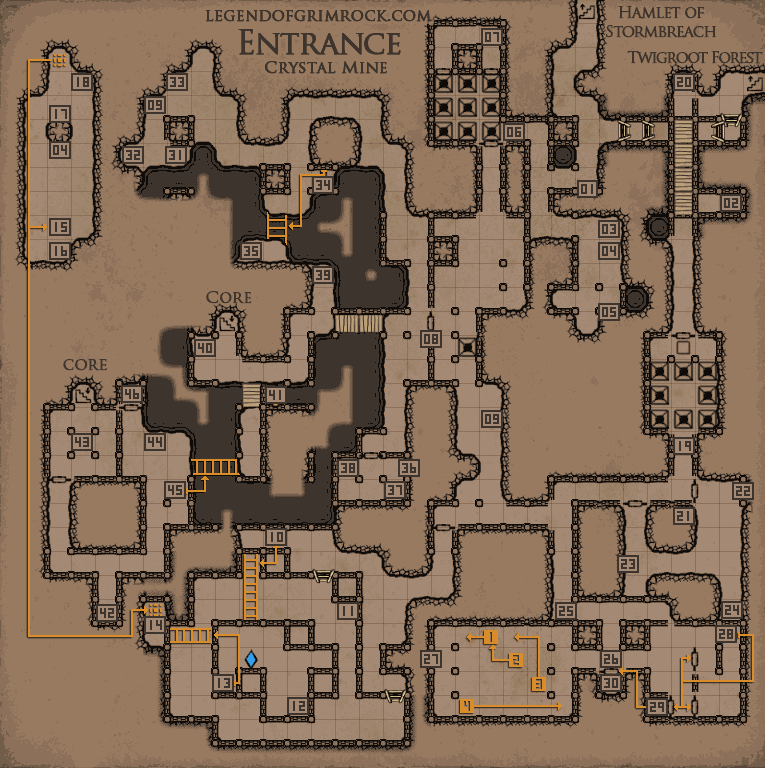 Walkthrough will follow 01 - Secret Button 02 - Sack Contains: Blooddrop Cap (4), Etherweed (1) 03 - Full Helmet 04 - Blooddrop Cap (1) 05 - Gold Keylock Requires Gold Key Opens the tile to the left containing: Pellets (50), Cannon Ball (10) 06 - Gate Puzzle This room has 9 pits and 4 buttons The buttons will open/close every pit adjacent to the tile you stand on while pressing the button, even diagonal tiles. The right order to cross is as follows: South Button, East Button, walk north across the room to flip the button at 07 so the northwest gate will open, AND the southern door will open. Press the western button and leave them in this position so you can always cross. 07 - Switch opens/closes the northwest door, the northeast door and the southeast door. 08 - Mine Keyhole Requires the mine key at 30 to open. 09 - Falconskyre 10 - Button Extends the bridge towards the crystal of life. Crossing the bridge, you will get attacked by flying squids and beholders, be careful. 11 - Pellets (10) 12 - Cannon Ball (5) 13 - Secret Button Will extend the bridge towards the Shard of Protection at 14 14 - Shard of Protection Picking up this shard will teleport you a secret room. A room full of fire elementals and Ice guardians. Be prepared to fight. 15 - Secret Area This area can only be reached when you pick up the shard of protection at 14, and get teleported here. 16 - Pellets (20) 17 - Poison Bomb (1) 18 - Broadhead Arrow (2) 19 - Fearless Puzzle, sign Only the Fearless may pass Notice that right before the door, is a pressure plate, this will open the door but it will also fire a fireball at you from behind that door. But notice that there's a receptacle behind you at 21. If the fireball hits this receptacle, all the pits will open and you are trapped or you'll fall down. So DON'T step away from the fireball. Be fearless! Take the hit, it will not harm you much, but it will teleport you onto the pressureplate. Past the open pits, allowing you to continue. As you continue on, you will see the island master in the distance, but he will vanish when you get closer. 20 - Spark Puzzle Stepping on this pressureplate will cause a spark to fire from north to south. If it hits the receptacle at 21, the pits will close. But you cannot outrun this pressureplate by stepping on it. You need to fire a tangible (not magic) projectile towards it from a distance, that gives you a head start. 21 - Receptacle If shot by the spark fired from the pressureplate at 20, it will open the door on the left. 22 - Crystal Boots 23 - Scroll of Meteor Storm 24 - Lockpicks (1) 25 - Sign Simulacrum The Philosopher stones in the western room mimic the location of the forcefields in the eastern room. 27 - Button Resets the positions of the stones. 28 - Button Opens/closes the doors in this room, allowing you to reach the switch at 29 (if you cleared the path properly) 29 - Switch Opens the door at 30 30 - Mine Key Use in Mine Keyhole at 08 31 - Smoked Sea Bass 32 - Blackmoss (1) 33 - Sack Contains: Salted Sausage, Antivenom (2), Torch 34 - Secret Button Raises the bridge closeby, indicated on the map, leading to the treasure chest at 35 35 - Treasure Chest Contains: Meteor Gauntlet Requires Lockpick 36 - Crossbow, Crossbow Quarrel (3) 37 - Cannonball (5) 38 - Energy Potion (1) 39 - Blackmoss (1), Pellets (10) 40 - Recipe The most powerful potions contain the power of the crystals. 41 - Descend here Jump down here for the Crystal Greaves and Lockpicks (1). 42 - Salted Sausage, Speed Potion (1) 43 - Power Gem Room This area is only accessible from the Core. 44 - Power Gem 45 - Switch Raises a magical bridge going east. 46 - Gold Keyroom Contains: Repeater Opened by Gold Key. |
DonateIf you like our walkthroughs and want to support us to continue expanding this into more detail and perhaps other games, you can donate to us. We would greatly appreciate it. |