Legend of Grimrock II
LexiconaryRuins of Desarune Sublevel 2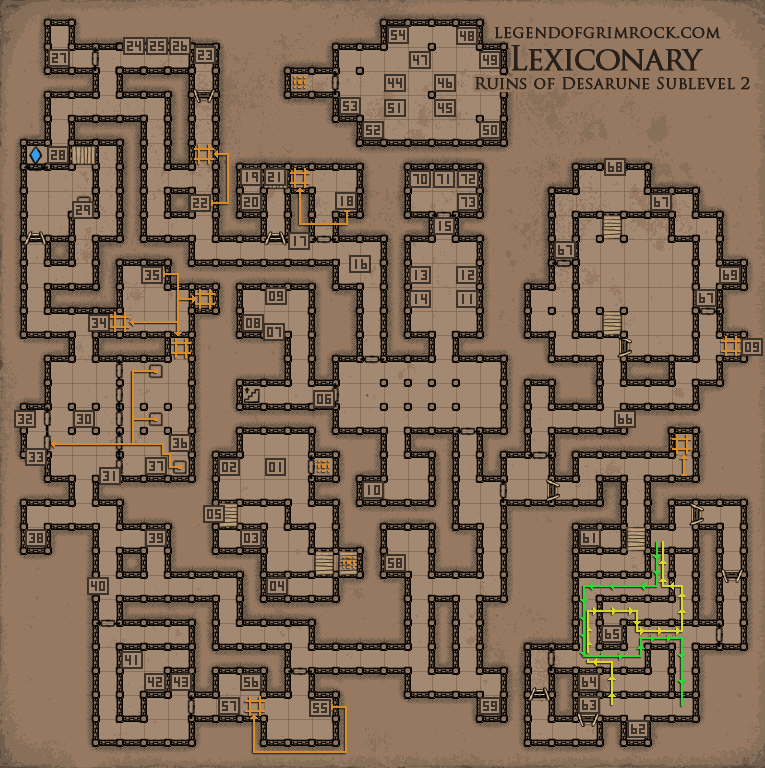 01 - Pitfall Room You fall into this room from Archives at 26 02 - Pellets (10) 03 - Sack Contains: Cheese (2), Pellets (10) 04 - Crystal Shard of Healing (1) 05 - Switch (lower level) Opens the door which leads to the teleporter that brings you back upstairs. 06 - Switch Opens the door. 07 - Wooden Box Contains: Lizard on a stick, Bread, Pitroot bread, Cheese. 08 - Pellets (10), Shuriken (3) 09 - Blackmoss (1) 10 - Rock (1) 11 - Sign I can walk 12 - Sign I can't fly 13 - Sign I'm the strongest 14 - Sign I'm alive 15 - Sign The Lexiconary You need to gather the figurines scattered around this level. Place the Skeleton Figurine in the alcove next to the I can walk sign at 11. Place the Snail Figurine in the alcove next to the I can't fly sign at 12. Place the Ogre Figurine in the alcove next to the I'm the strongest sign at 13. Place the Crowern Figurine in the alcove next to the I'm alive sign at 14. 16 - Round Key Dropped by Crab in this area. 17 - Round Keyhole Use Round Key dropped by Crab in this area. 18 - Secret Button Opens moveable wall in the room. 19 - Tome of Fire 20 - Crystal Shard of Recharging 21 - Lock Picks (1) Found on lower level. 22 - Secret Button Opens moveable wall next to you. 23 - Crystal Shard of Protection 24 - Sign Scroll Put a sword-like weapon in the alcove behind the sign. 25 - Sign Rock Put a scroll in the alcove behind the sign. 26 - Sign Sword Put a rock in the alcove behind the sign. 27 - Ogre Figurine 28 - Crystal of Healing 29 - Lightning Rod When you stand on the pressure plate a lightning bolt will be fired at you. Avoid it or put a shield in front of it. 30 - Teleporter Puzzle On the other side of the room behind the gates you will see another teleporter. This teleporter is linked to the teleporter on this side of the room. Note that this teleporter only teleports non organic matter, so you cannot step through it, but items will. Pressing The button at 31 will move the teleporter from east to west. Click the button untill the teleporter is in the middle. Now walk to the teleporter on your side and place an item on the floor inside it. This will transport the item on the pressure plate on the other side. Leave the teleporter on the same position and stand south of it. Now throw an item through it. The item will land on the second pressure plate. Now press the button untill the teleporter is all the way east. Now walk north of your teleporter and throw an item through it again. The item will land on the third pressure plate and open the gate on the west side of the room. 31 - Button Switches the location of the teleporter on the other end of the room. 32 - Crowern Figurine 33 - Secret Button Opens the wall at 34 34 - Rock, Moveable wall 35 - Blooddrop Cap, Secret Button Opens 2 moveable walls containing skeletons. Also closes the moveable wall you came from. So press it again to go back. 36 - Morning Star 37 - Lizard on a Stick 38 - Secret Button Teleports you into a room with 3 walking treasure chests. 39 - Blooddrop Cap 40 - Switch Opens the door next to you, and fireballs keep shooting at you from the other room. Avoid it. 41 - FalconSkyre 42 - Switch Turns off the teleporter on the topside. This way you can reach the area containing the treasure chest. 43 - Treasure Chest Requires Lockpick Contains: Plate Gauntlets, Darts (3) 44 - Ornate Room You get teleported from pressing the secret button at 38 This room is filled with treasure monsters. Kill them and find the Ornate Key to open the gate and go back. 45 - Rock (1) 46 - Shield Potion, Ornate Key, Blooddrop Cap (2) 47 - Neck Chain, Broadhead Arrow (1) 48 - Shoes 49 - Energy Potion (1) 50 - Tattered Shirt 51 - Firebomb (1) 52 - Healing Potion 53 - Lock Picks (1) 54 - Torch 55 - Secret Button Opens the moveable wall to the west. 56 - Crossbow Quarrel (3) 57 - Mirror Chestplate 58 - Shuriken (1) 59 - Shuriken (2) 60 - Secret Button Opens wall behind you, Containing Bread, Cheese and a Torch. 61 - Path of the Eagle Puzzle You need to get across the chasm while staying on the second level. This puzzle is quite simple when you know what to do. Look down while standing on the second level and find the lowest trench. This is the path to follow to cross the room. We have indicated the path on the map using a green line. Completing the path will close the door in the east and opens the door to the west. Preventing you from going back. 62 - Snail Figurine 63 - The Disguised Path Puzzle This puzzle is similar to the Path of the Eagle Puzzle, but instead of following the lowest level of this room as a path, follow the clean pathway tiles instead of the dirty ones. We have indicated the path on the map using a yellow line. Completing the path will close the door in the west and opens the door to the east. Allowing you to go back. 64 - Smoked Sea Bass 65 - Shuriken (3) 66 - Sign The Crossing 67 - Pressure Plate Activates Philosopher Stone. 68 - Skeleton Figurine 69 - Great Axe 70 - Power Gem 71 - Bear Pelt 72 - Scroll 73 - Crystal Flower 74 - Bread, Cheese (2), Torch |
DonateIf you like our walkthroughs and want to support us to continue expanding this into more detail and perhaps other games, you can donate to us. We would greatly appreciate it. |