Legend of Grimrock II
Orul's CryptCemetery Sublevel 2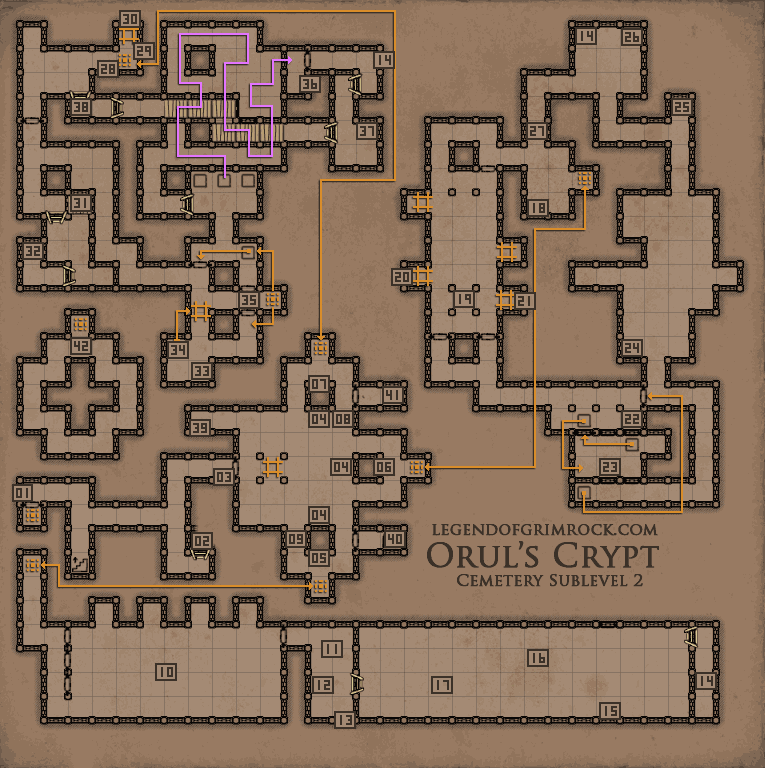 01 - Sign Windgate to surface This door opens to the Cemetery surface. Once opened, you will be able to travel back and forth. 02 - Crystal of Life 03 - Sign Crypt of Orul Wormbound. 04 - Skull Lock Requires a Skull key to open. Opening all 3 locks will trigger the fight against Orul Wormbound. 05 - Sign The Laboratory 06 - Sign The Laboratory 07 - Sign The Sanctuary 08 - Deadmoss (2) 09 - Deadmoss (1) 10 - Live test chamber This room holds all the dungeon creatures you fought before. You will see 4 alcoves on the wall with a chain you can pull. Pulling the chain will release 3 cubes of enemies at the same time. Keep pulling and clearing the room. Once cleared, keep pulling the chains until the door opens. We randomly pulled the chains and it opened and dit not find a pattern yet. 11 - Spike Chamber When you pick up the note at 13, you find a riddle. You need to turn off the lights by taking the torch that's still lit in the pit. Turn around and you will see blue glowing balls on your path. Those tiles are safe to wait on. But each wave, the blue balls of light switch position, so be careful. 12 - Leather Gloves 13 - Note Dear Visitor, 14 - Skull key Use in Skull Keyholes to trigger the boss event. 15 - Lightning bomb (1) 16 - Crossbow Quarrel (1) 17 - Cheese 18 - Falconskyre (1) 19 - The Trickster / Leprecaun Careful, the trickster is standing on a pressureplate, when he steps off, the movable walls will open up, releasing enemies into the room. 20 - Blooddrop cap (1) 21 - Lightning Bomb (2) 22 - Shield Puzzle Drop down an item here through the grate and the southern door will open up. If you step on the pressureplate on the upper side and look sough, you will see that briefly, the force field furthest away will deactivate. You need shoot an item towards the south onto the pressure plate. You need to time it into the rotation of the fields and step onto the pressureplate and fire. If timed correctly, the door to the east will open up. Feel free to jump down to collect your items that you've used and missed the target. 23 - Crossbow Quarrel (3) 24 - Button (spark puzzle) This button will enable all the sparks and shutdown the forcefield at the end of the hallway. You must make it across without hitting any of the sparks. We found that it's easier to cross from the left (west) side. 25 - Treasure Chest Requires Lockpicks Probably trapped Contains: Diviner's Cloak, Bread, Horned Fruit 26 - Knuckles of Steel 27 - Switch Opens the wall to head back to the teleporter. 28 - Secret Button Disables/Enables the teleporter behind you 29 - Secret Button Opens the movable wall to your left (north), revealing an ancient skeleton. 30 - Scythe 31 - Scroll of Fireshield, Greater Energy Potion 32 - Rage Potion (1) 33 - Note, Horned Fruit I decided to drop my trusted axe into the teleporter to see if it is safe. I wish I would know where it went. 34 - Switch Opens the movable wall allowing you to get back to the corridor. 35 - Teleporter Puzzle First step through the teleporter if you haven't done so and read the note As it turns out, this teleporter separates living material from dead material. If step through, it will teleport you to the room on the right (south). If you throw something through it, it will land on the pressure plate in the room on the right (north), opening the door in the northwest. 36 - Light Puzzle, sign When the room is void of light, the door will open This means that you need to walk over the skybridge, but each step you take, that tile will go out until you start over again at the pressureplates in the south. Your goal is to disable all the tiles while still ending up on the top at the door. Follow the path indicated on the map to hit every tile. 37 - Sack Contains: Blooddrop Cap (3), Etherweed (1), Falconskyre (1) 38 - Switch Will open the wall on top of you, allowing you to get back to the start of this area. 39 - Button Will open the entrance door at 03 to allow you to get back. 40 - Treasure Chest Requires lockpicks Contains: Potion of Willpower, Brace of Fortitude 41 - Power Gem 42 - Pitfall Room You fall into this room from the real time puzzle in the Wormbound Catacombs at 54 |
DonateIf you like our walkthroughs and want to support us to continue expanding this into more detail and perhaps other games, you can donate to us. We would greatly appreciate it. |