Legend of Grimrock II
Ruins of Desarune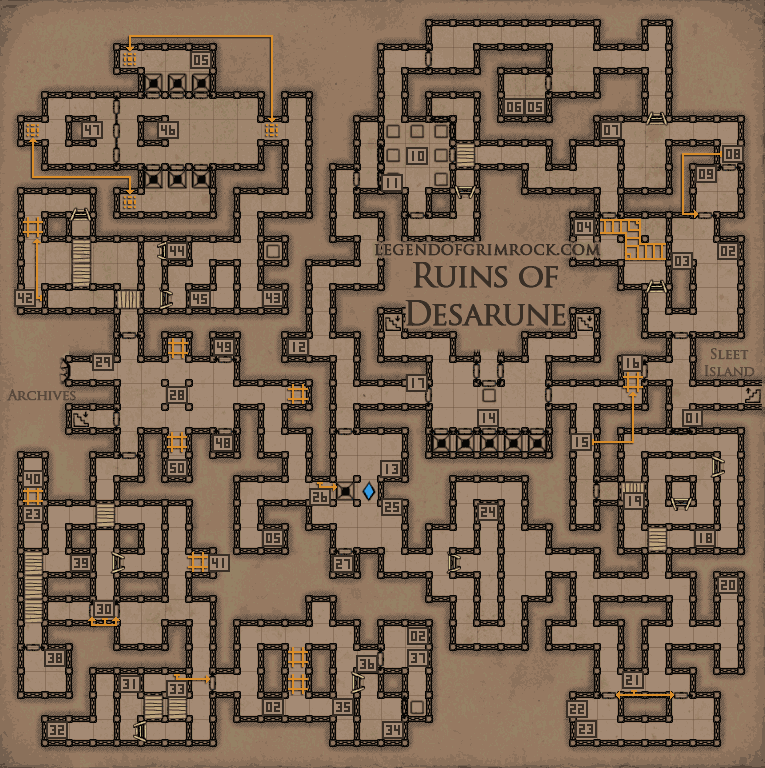 Walkthrough will follow 01 - Sign Meditation Spire You can't go in here, you'll have to find a way around 02 - Mudroot 03 - Secret Button Pressing the button will create a bridge across the chasm. It doesn't last very long, so you'll have to run over the bridge 04 - Bronze Brace, Resurrection Potion 05 - Blooddrop Cap (1) 06 - Fist Dagger 07 - Salted Sausage 08 - Switch Will open the gate to the next room on the opposite side, but from that has the Crystal Guard in there, he's very tough and hits very hard. Be careful. Fire seems to work very well against him. If possible stay at a distance, when he casts you can move away. Backtrack to get back into the room. 09 - Scroll of Fireball, Round Key 10 - Pressure plate puzzle Make sure you take down the Crystal Guard first and get the items from his room, otherwise you will need to backtrack. This room is a little puzzle, but complicated if you don't see what happens. Every pressure plate will, once pressed, create a magical bridge on top of it. But if any plate is pressed, the door leading up to where you can use the bridge will be blocked. So make sure there are no items on the plates, use the southern door, climb up. To get the plates to be pressed, place an item just over the edge so it falls down, step on the bridge, turn around, and drop another. Repeat this until you reach the Round Keyhold. If you value your items, you can jump down, collect the last 2 items (northwest and north), because you don't need those as a bridge anymore. 11 - Round Keyhole Put the round key found at 09 into the hole to open the door to the west. 12 - Lizard on a stick 13 - Scroll of Light 14 - Spider Puzzle This is a puzzle that takes place on 2 levels, on the Ruins of Desarune Level and the Archives level, fortunately, there are 2 staircases leading down. There is a code you need to find. There's a pressure plate on the top level (Ruins of Desarune level) which will open all the northern gates when you press it. On the lower level (Archive level), the plate will teleport the spider to the top level again, all the way into the back. As you can also see, there's a pressure plate in the spider's path, but the spider cannot move on the lower level because of all the gates. So activate the lower level pressureplate to teleport the spider to the top. Walk back up, stand in front of the spider (not on the pressure plate yet) and step on it, the moment he is above the pressure plate on the lower level. This will drop the spider onto the pressure plate. If you haven't figured it out yet, you need to drop the spider when he's on the 2nd (middle) closed pit door, then drop him. First part is done. Now, move downstairs, go towards the south wall. You will notice light shining from the top, but only from some pits. That's the code you're looking for. Go back to the top level and drop an item into the pits that were illuminated downstairs. In case you did not write it down, counting from west to east, relative to the map (not your field of view): the 2nd, the 4th and the 5th. Wait a few moments and the east door will open. Don't forget to go downstairs as well as a wall opened up for extra gear. 15 - Secret Button Opens the wall at 16 16 - Legplate Picking up this item opens the gate behind you, allowing you to go back outside easily. 17 - Switch Opens the door 18 - Bread 19 - Firebomb (2) Located below the bridge. 20 - Heavy Shield, Shuriken (3) Be careful, there's a Giant Crab protecting it, they are really tough and lethal. 21 - Crab Den Opening this door will open the gates releasing 2 giant crabs. As said before, these are very tough, especially when there's 2 of them. Make sure you cleared the crab at 20 first, you don't want to fight 3 of them. 22 - Broadhead Arrow (3) 23 - Pellets (10) 24 - Smoked Sea Bass 25 - Scroll of Darkness 26 - Switch Closes the pit on the right to make it easier to pass through the Ruins 27 - Golden Key Room Requires Gold Key to open Contains: Ax 28 - Iron Key Room There are two slots to put the iron keys in. They will open the gate that allows you to reach the switches. Those switches will open the way down to the Archives and opens the wall that contains the Power Gem you've probably heard humming already. Flipping the switches at 48 and 49 will cause all the moving walls to open and the door to the archives as well. 29 - Sign Hamlet of Stormbreach As you can see, the corridor has collapsed, you will have to find a way around. 30 - Button This button will open both doors. Be warned, there's a Crystal Guard and a slime monster on both sides, so you'll not only be fighting the crystal guard now, but the slime monster as well. 31 - Secret Button, Mudroot (1) Secret Button creates a little bridge on top of you so you can reach Tome of Earth 32 - Tome of Earth, Lockpicks (1) 33 - Switch Opens the door to the east. 34 - Cheese 35 - Slime Puzzle Push the secret button at 06 then fire a projectile onto the pressure plate and the door will open. This will also open the movable walls in the west of the area. 36 - Secret Button Opens the southern gate so you can fire a projectile through it onto the pressure plate. 37 - Iron Key Required in the Iron Key Room 38 - Jewel Pendant, Speed potion 39 - Smoked Sea Bass 40 - Blooddrop Cap (1) This wall opens up after you picked up the Iron Key 41 - Healing Potion (2) This wall opens up after you picked up the Iron Key 42 - Secret Button, Falconskyre (1) The button opens the movable wall in the north. 43 - Frost Bomb (2), Bread 44 - Chest Puzzle From this position, shoot a projectile towards the pressure plate in the east, this will extend the bridge towards the Treasure Chest at 45 45 - Treasure Chest Requires Lockpicks Contains: Zarchton Harpoon, Rage Potion 46 - Switch Turns on the teleporters in this room. And opens the door at 47 If you got everything from the room and from the room down the pits below, flip the switch again so you can return. 47 - Iron Key 48 - Button, Bear Skull Helmet Flip the switch. This is a switch that needs to be flipped together with the switch at 49 49 - Button, Throwing Knife (2) Flip the switch. This is a switch that needs to be flipped together with the switch at 48 50 - Power Gem |
DonateIf you like our walkthroughs and want to support us to continue expanding this into more detail and perhaps other games, you can donate to us. We would greatly appreciate it. |