Legend of Grimrock II
Pyramid of Umas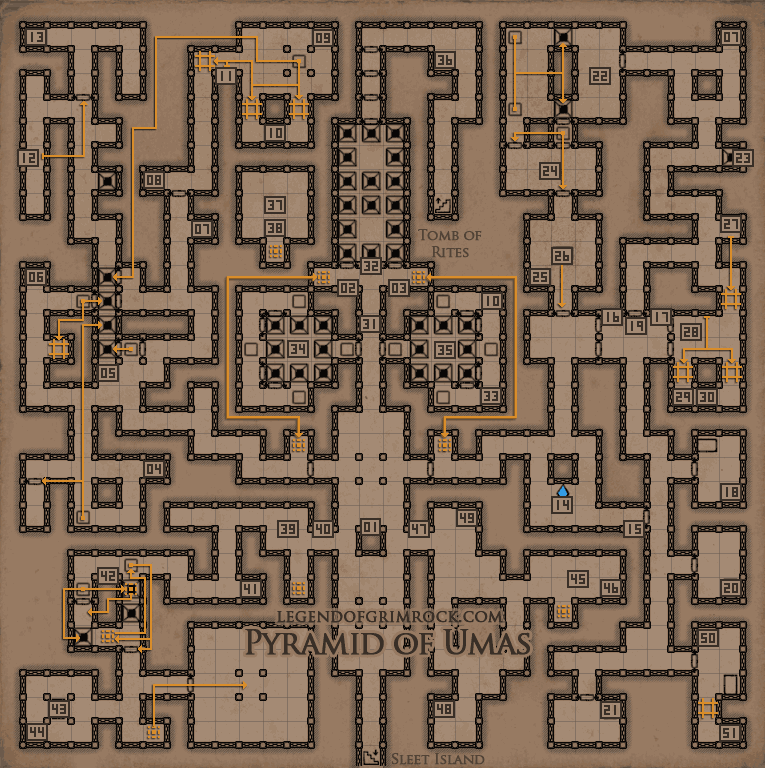 01 - Recipe: Speed Potion 02 - Sign Tomb of the Forgotten 03 - Sign Tomb of the Highborn 04 - Shuriken (2), Pellets (10) 05 - Pit Hallway This hallway has 4 pits in it. Stepping on the pressureplates will close one pit. The location of the plates are indicated on the map. These plates are one-way plates, meaning they don't go back if you step off them, so you don't need to leave an item on them. Stepping on each plate also opens a hidden door with enemies behind them, indicated on the map. 06 - Enbalmer's headpiece 07 - Falconskyre (1) 08 - Throwing Knife (1) 09 - Torch 10 - Pellets (10) 11 - Secret Button Opens the wall that closed when stepping on the plate. 12 - Button This button causes a spark to fly from south to north into the receptacle. This will open the door. Make sure you move away from the spark as soon as you press the button, otherwise the spark will not make it into the receptacle. 13 - Tomb Key 14 - Crystal of Life 15 - Sign Burial Chambers 16 - Wand of Fear, Note Wand of Fear 17 - Moonblade, Note Moonblade 18 - Greater Healing Potion, Pitroot Bread 19 - Gate Puzzle To open the door, you must return the gifts that were brought to the graves that they belong to. The notes will give you a hint in which tomb to return it to. You may have noticed that each tomb has a different number of sarcophagusses. The Wand of Fear was a gift to Hamon the Merchant who died alone. You will need to put it on the sarcophagus at 20 The Moonblade was meant for Numan the warrior, his companion and child. You will be looking for a tomb with three sarcophagusses. Put the moonblade on the sarcophagus at 21 You can take the gifts back when you go back. 20 - Hamon the Merchant Sarcophagus Put the Wand of Fear on this in order to open the door at the gate puzzle 21 - Numan the warrior, Sarcophagus Put the Moonblade on this in order to open the door at the gate puzzle 22 - Pit Puzzle Throw an item on each of the pressure plates across the pits. If you don't have any projectiles, jump down in the pit, you'll find a bow and 2 arrows there, and a few mummies. Putting weights on both plates will cause the pits to close. When the pits are closed, stand on the left pit (south) and put an item through the grate. Don't yet pull your items from the plates. 23 - Opened pit This pit, once closed, but is opened by solving the Pit Puzzle It's worth jumping down, but first, if you did not yet jump at the Pit Puzzle, do so first and flip the switch and come back here. 24 - Pressure plate puzzle You're in a room and the door leading onward is not opened yet. Look at the other gate that has the pressure plate. This causes the door to be closed. You need to take the item off the plate again, but you cannot reach from here. Put an item on this side of the plate as well, go back, take the item from that side, take the items from the other plates as well, and move back into this room. You can now remove the item from the plate on this side, and the door will open. 25 - Cannonball (4) 26 - Tomb Key Grabbing this key will cause the door towards the Crystal of Life to open for you. 27 - Secret Button Opens the wall in the south, indicated on the map. 28 - Button Opens 2 movable walls in the south containing a secret room... and snakes. 29 - Lockpicks (1) 30 - Mirror Gauntlets, Note Note: Mirror Gauntlets Hang on to this item, you will need it for Burul's Tomb 31 - Tomb Keyholes Both sides of the walls have Tomb keyholes that requires the Tomb key to open each side. You can find the Tomb keys at 13 and 26. Tomb puzzle This puzzle requires you to push all the buttons in this room to open all the doors at the end of the room. Leaving the room where you came from will close all the doors again. You will need to use the Tombs that you used to the Tomb Keys for. The pressure plates will close the open gates and open the closed gates for all 3 gates on their respective side. I.e. triggering the northern pressure plate, it will open/close all northern pits. Here's the big part of the puzzle: it will do the same for the pits in the large northern room at 32 as well. The western room deals with the first set, the eastern room deals with the second set. the pits open/close in the same way relative to the wind direction, not the area you're facing. I.e. the doorways are not the starting point for the main room. Now, you need to make it so that the buttons in room 32 can all be reachable, AND you need to be able to walk across. See 34 - Western Tomb Room and 35 - Eastern Tomb Room for the solution. 33 - Shuriken (1) 34 - Western Tomb Room Put items on the northern, eastern and southern pressure plates. (Not on the western one). 35 - Eastern Tomb Room Put items on the northern, eastern and southern pressure plates. (Not on the western one). This means you actually do need to put an item on the western one because otherwise you'll fall down. Put it on the western one, then put it on all the other plates, leave the room, and pick up the item on the western plate. 36 - Poleaxe, Boiled Crag Beetle 37 - Pitfall room You fall in here from the Offer room puzzle You can take the teleporter back up again. 38 - Poison Bomb (1) 39 - Pitfall Room (Tomb of the Guardian) You can enter this area by falling down from the Fireball puzzle in the Tomb of Rites at 24 You can take the teleporter back up, but be aware, the destination of the teleport is in the fireball's path, so move out as soon as you can to avoid getting hit. 40 - Secret Button Opens the wall allowing you back into the main corridor. 41 - Torch, Mole Jerky 42 - Sign Tomb of the Guardian First, in order to reach a secret room downstairs, put an item on the closed pit. In order to cross, put an item on the pressure plate at the gate (western one), put the item as close to the gate as possible so you can take it again from the other side. Don't put it on the other pressure plate yet. Step through the teleporter that appears, now take the item from the pressure plate through the gate to close the pit behind you. Walk towards the door and face north. Throw an item across the pits so it lands on the other pressure plate and the door will open. Go down the pits to find the secret room before you continue onwards. 43 - Ancient Claymore A very powerful weapon with the right person to wield it! It's worth it to come all the way here. Initially, the table is shielded and you cannot break the shield. In order to lower the shield, step through the teleporter across the hall. This will teleport you in the large room across to fight several enemies. Once those enemies are killed, the shields are lowered and you can claim your prize. 44 - Lizard on a stick 45 - Pitfall Room You can only enter this room when falling down at the Teleporter Puzzle in the Tomb of Rites 46 - Shuriken (1) 47 - Secret Button Opens the wall to the west to allow access back to the main corridor 48 - Xafi Khakis, Pellets (10), Greater Energy Potion 49 - Switch Enables the teleporter to bring you back upstairs. 50 - Hidden button Opens the hidden wall to the south 51 - Storm Amulet, Lockpicks (1) |
DonateIf you like our walkthroughs and want to support us to continue expanding this into more detail and perhaps other games, you can donate to us. We would greatly appreciate it. |