Legend of Grimrock II
Sleet Island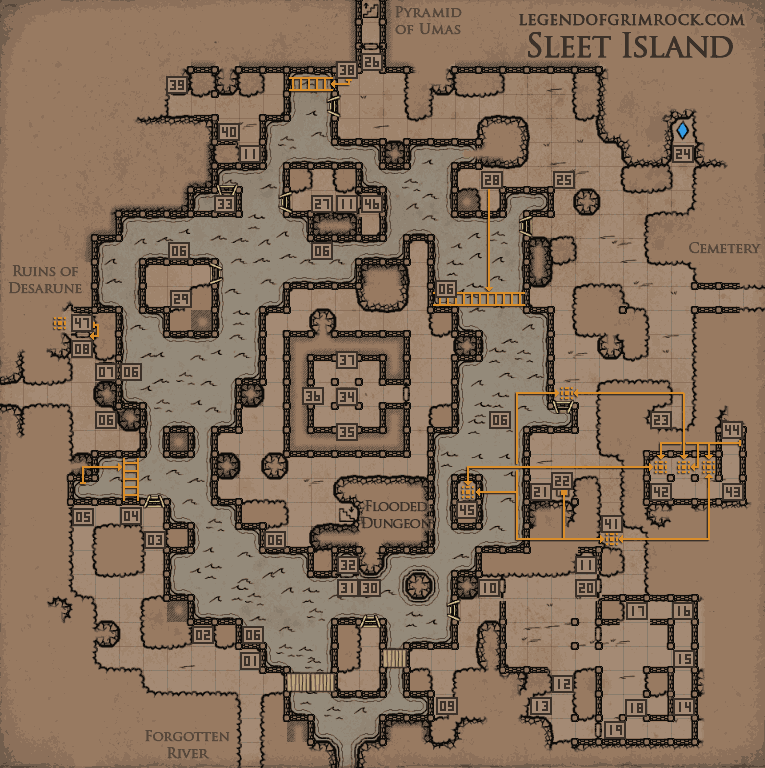 01 - Rock (1) 02 - Island Map, Letter Dear Visitor,  03 - Rock (1) 04 - Bridge Magical Bridge appears by awakening the guardian at 05. 05 - Sign "I am the guardian of the bridge, wake me up. This basically requires you to cast a spell onto the demon head against the wall. This creates a bridge at 04. 06 - Etherweed (1) 07 - Secret Treasure (use shovel) Contains: Zarchton Harpoon, Shield Potion (1) Treasure Map from Tomb Underground at 04 08 - Gate, Horned Fruit. Gate gets opened from the inside which can be reached from the Archives in the Ruins of Desarune 09 - Arquebus Beware! You get teleported into a room filled with mummies when you pick up the Arquebus. 10 - Sign, Lever Lever opens gate next to you. Sign reads: Mind and Matter Mind and Matter puzzle Activate the lever at 12. Push the cube forward twice to enter the next room. Go around the cube and push it back to the gate near 12. Walk to 14 and press the secret button, this will open up the wall at 15 Push the 2nd cube while standing at 17 and then push it against the other cube. Press the button at 18 and move away in time to make the demon head shoot into the receptacle. Move through the gate at 19 and place the cubes on their respective orange spots. This opens the gate at 20. 11 - Blooddrop Cap (1) 12 - Lever Activates Philosophers Stones. 13 - Leather Cap 14 - Secret Button Opens wall at 15. 15 - Wall Opened by secret button at 14. 16 - Wooden Box Contains: Salted Sausage, Smoked Sea Bass, Horned Fruit, Bread, Recipe: Rage Potion. 17 - Lock Picks (1) 18 - Button Activates demon head to shoot. 19 - Gate Opened by pressing the button a 18 and moving away in time. 20 - Gate Opened by placing both cubes on the orange spots. 21 - Sign Danger 22 - Pressure Plate When stepped on, wasps are being teleported into your location to attack you. These teleporters only stay on for a second or two. If you hurry, you can run to the teleporter at 41 and find the secret area(s). 23 - Sack Contains: Pitroot Bread, Rage Potion (1) 24 - Crystal of Life, Recipe: Antivenom, Antidote 25 - Secret Treasure (use shovel) Contains: Meteorite 26 - Letter Dear Visitor, 27 - Statue Head The silent one has a friend The silent one can be found at 28 The silent one's friend can be found at 29 in the Cemetery 28 - Statue Head ... As the silent one's friend in the cemetery said: Look into the direction where this statue is looking during the night. If you look long enough, you will see a bridge appear. So stand on this spot during the night, look south and wait a few seconds until you see a Leprecaun enable the bridge and cross it. Follow him and the bridge will stay open. 29 - Tribal Shield, Note A treasure chest long lost, guarded by the four fallen spirits in the bog. 30 - Sign Hold your breath 31 - Pressure Plate Opens gate in front of you once you hold your breath long enough. 32 - Skull, Antidote (1) 33 - Forcefield. 34 - Scroll of Frost Shield 35 - Statue Head This is the elemental shrine of water. 36 - Statue Head Oh thee seeker of the hidden shrine. 37 - Statue Head Bring forth four power gems to fuse them into the essence of the element. 38 - Secret Button This button will enable a magical bridge to the west of you so you can cross to the next island. 39 - Statue Head, Crystal Flower The gate to the fifth shrine is hidden from sight. 40 - Secret Button Disables the Forcefield in the bottom of the river. 41 - Secret Teleporter There is a hidden teleporter here that brings you to the room in the east. This teleporter can be enabled very briefly by pressing the pressure plate at 22. This requires you to run to the teleporter here. It's easier to not stand on the pressure plate, but stand in front of it, so you can see the teleporter, and then put an item on it. This saves you one step of running. 42 - Skull 43 - Statue Head Here, even the winds are guided by him and them 44 - Secret Button, Scroll of Shock Shield, Pellets (10) The secret button activates 3 teleporters the first (closest to the button) teleports you to where you came from, the second closest teleporter teleports you a little north of the pressure plate at 22 the teleporter furthest away teleports you to another secret location: stormseed orb at 45 Making it to the third teleporter that teleports you to the next secret location is very tricky, and requires perfect timing. If you run to the teleporter without any pauses, so in a perfect run, the teleporter will be gone the moment you step in it, so that will not work. If only you can get a tiny bit more time... You can! Here's how. At the secret button, face north, and walk backwards. When walking backwards, you can click the secret button while moving if you're fast enough. This saves you this tiny little bit of time to make it in time to the teleporter. Good luck! 45 - Stormseed Orb 46 - Button Opens the gate. Can only be reached from the teleporter at the north-east of the Barren Desert 47 - Button Opens the gate. Can only be reached from the teleporter at the Archives |
DonateIf you like our walkthroughs and want to support us to continue expanding this into more detail and perhaps other games, you can donate to us. We would greatly appreciate it. |