Legend of Grimrock II
Wormbound CatacombsCemetery Sublevel 1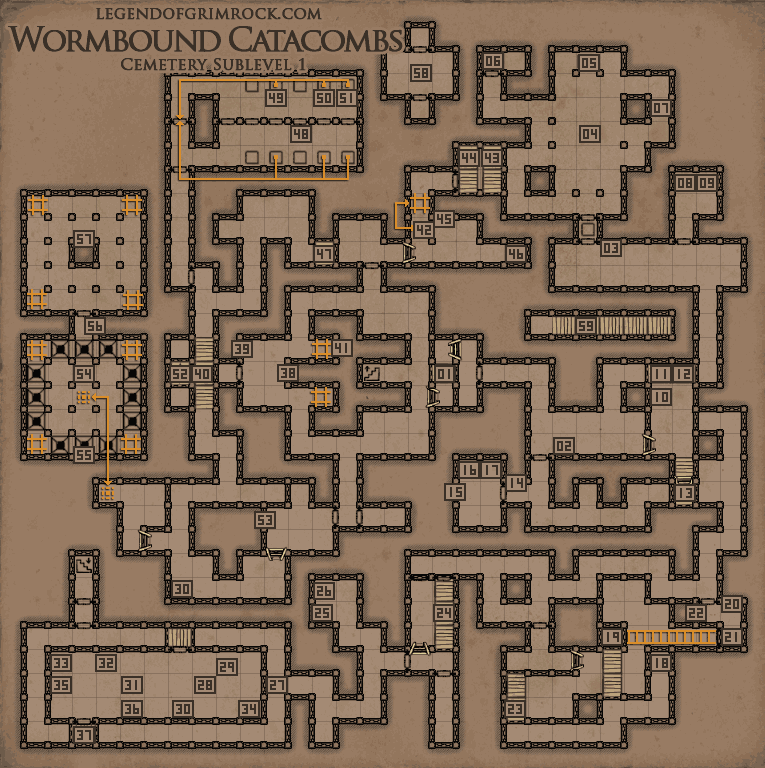 01 - Crossing the Bridge, Sign The Bridge It may seem easy to cross this bridge, but that's not how it seems. In fact, the way you cross it, will open the door for you. In open to open the door, do the following: - Start from the west side of the bridge - fall down on the left side of the bridge - turn left and walk under the bridge - take the ladder up which leads back to the west side of the bridge - fall down again on the left side of the bridge - turn right and walk under the bridge - climb up the ladder, back to the west side of the bridge. - Now, cross the bridge so you're on the east side - Face west - Fall down on the left (south) part of the bridge - Turn right (face north) and walk under the bridge - climb up the ladder, back to the east side of the bridge - Fall down on the left (south) part of the bridge - Turn right (face north) and walk under the bridge - climb up the ladder, back to the east side of the bridge - Cross the bridge towards the west - Turn and cross the bridge towards the east In short: Go below the bridge but end up on your own side twice. Cross the bridge. Go twice below the bridge again. Cross the bridge back and forth. 02 - Skull keyhole Requires Skull Key at 04 03 - Sign Chamber of Xarant Wormbound. 04 - Xarant Wormbound - Bossfight Pretty straightforward bossfight, make sure you crawl into a corner while fighting, so you cannot be attacked from the side by zombies. 05 - Skull key Use in Skull Keyhole at 02 to open the door. 06 - Gold Key storage Room contains: Meteor Graves, Pellets (10) 07 - Crystal Shard of Healing 08 - Greater Healing Potion 09 - Sack Contains: Blooddrop Cap (3) 10 - Huntsman cloak 11 - Throwing Axe (2) (lower level) 12 - Falconskyre(1) (lower level) 13 - Sign With icycles from beneath, I strike at thee Put the Ice guardian figurine into the alcove to disable the forcefield, allowing you to pick up the Tome of Water 14 - Sign The Silver Scepter of Isochronos 15 - Shovel, Note Where there is nowhere to hide from sunlight, the loneliest of all trees resides. 16 - Energy Potion 17 - Cheese 18 - Secret Button Pressing this button will disable some of the teleporters, so the fireballs in this room hit the wall earlier, allowing a safer passage for you. 19 - Secret Button Opens a bridge behind you briefly, make sure you run to cross it. 20 - Ice Guardian figurine Place this at the alcove at 13 21 - Crystal Helmet 22 - Switch Opens the door next to you. 23 - Crossbow Quarrel (3) 24 - Spark Puzzle In this room, you will find a button on the top level and exactly below is a lever. The button will fire a spark . The lever will switch which door is opened (north or south). The south door has a teleporter that rotates the spark 180 degrees so it goes back north. The north teleporter will rotate the spark 90 degrees to the left into the receptacle which opens the west gate. How to do this: - Go to the bottom floor to make sure the north gate is opened - Go to the top and press the button - Immediately walk backward (fall down) and forward and flip the switch. (so the spark passed the north gate, and it will open the south gate now) - when you see the light of the spark coming towards you again, flip the switch again to open the north gate. With careful timing, the west door will open. 25 - Blooddrop Cap 26 - Crystal Flower 27 - Zombie Pit The inner room is full with zombies. There are levers on the walls that all need to be flipped. This enables the teleporter that leads back up and releases the power gem. But in order to get there, you will need to clear the zombie pit first. Note that you will not be able to protect your sides, you will alway have a side where enemies can attack you. Hint: use a force shield to block your side, so you can focus on attacking the enemy in front of you. Flip all the switches in this room to open the gates to the Power Gem, the teleporter to bring you back on top of the ledge, and the doors towards the stairs leading to Orul's Crypt 28 - Crossbow Quarrel (1) 29 - Switch, Mudwort(1) 30 - Falconskyre (1) 31 - Mudwort(1) 32 - Full Helmet 33 - Cannonball (5) 34 - Switch Flip it 35 - Switch Flip it 36 - Switch Flip it 37 - Power Gem (lower level) 38 - Sign These catacombs were built as the final resting place for the Wormbound family who, for countless generations, acted as envoys and ambassadors between the dragons and the other sentient species of the realm. 39 - Switch Opens the door on your left 40 - Crystal of Life Stepping into this room will cause the 2 movable walls in the room behind you to open up and releasing 2 packs of 2 ancient skeletons to step into the room behind you. 41 - Lightningbomb(2), Mudwort(1) 42 - Secret Button Opens the movable wall on your right. 43 - Tribal Spear 44 - Chest Contains: Blooddrop Cap (2), Hardstone Bracelet 45 - Legplates 46 - Pellets (10) 47 - Lockpicks (1) (lower level) There's an ancient skeleton waiting for you here that can give you a scare because you cannot see him before falling down. 48 - Pressureplate Puzzle You will need to mimic what's on the other side of the plates. Meaning you need to put an item on the 2nd, 4th and 5th plate, and the door to the backside will open. Note: if you take an item from the backside, the door will close, so you need to put a replacement item there. 49 - Crossbow 50 - Frostbomb (1) 51 - Full Helmet 52 - Flail (lower level) 53 - Scroll Under These are the instructions to cross the bridge at 01 Picking up this scroll will open up the doors behind you, releasing 2 ancient skeletons at you, but allowing you to return to the center of the map. 54 - Realtime Puzzle It's very difficult to see how this puzzle works, but once you know, it's easy. You will see pits in a circle around you, all are open except for one. You may have seen them move at one point, but not sure what triggers it. Well, time triggers it. The closed pit resembles the pointer of an hourglass, and the time it indicates is the time in the game. If you have the Time Piece, you can rest until it's 6 o'clock to get the Gear Key. And then rest till noon or midnight and the closed pit will allow you to cross into the next room. 55 - Gear Key Opens door for Gear Keyhole at 56 56 - Gear Keyhole Requires Gear Key at 55 57 - Bane Picking up Bane will cause all the walls in this room and the adjacent room to open. Each wall contains a Rock Golem in this room, and a Fire Elemental in the other room. Fighting the fire elementals is impossible, they just deal a huge blow to you once, you can probably not survive all four, so the best tactic is to drop down through the pits and regain your strength. 58 - Pitfall room You fell here from the Cemetery level for the Pit & Rotation Puzzle 59 - Pit fall roomr You fell here from the Cemetery level for the Pit & Sparkle Puzzle |
DonateIf you like our walkthroughs and want to support us to continue expanding this into more detail and perhaps other games, you can donate to us. We would greatly appreciate it. |