Legend of Grimrock II
SewersHamlet of Stormbreach Sublevel 1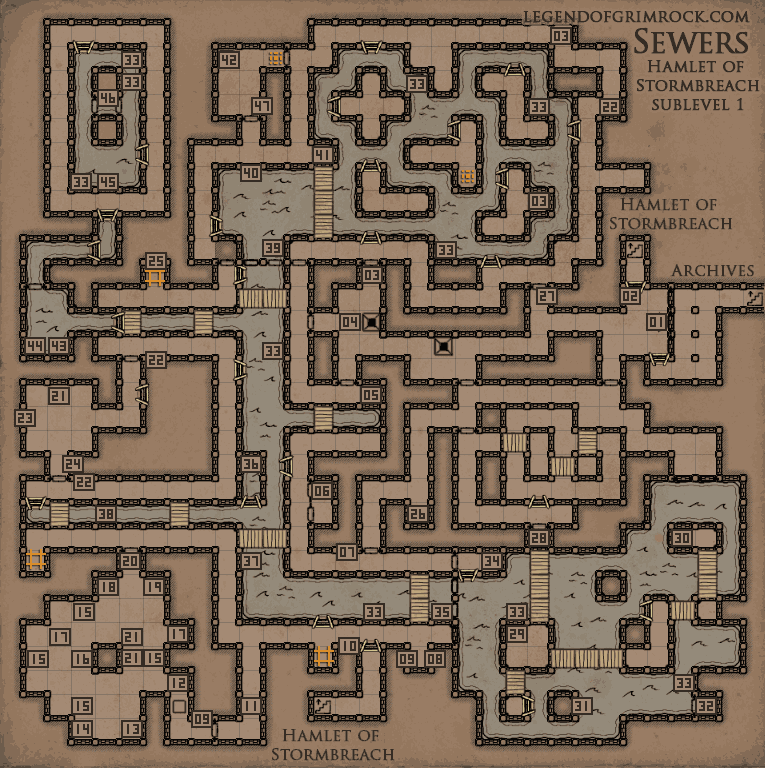 Walkthrough will follow 01 - Crystal of Life 02 - Sign Sewer Exit East 03 - Blooddrop Cap 04 - Lever Opens door to the south and west, shooting poison bolts at you from both sides. 05 - Lightning Bomb (2) 06 - Two-Handed Sword 07 - Sign Reservoir Access 08 - Sign Shortcut 09 - Brass keyhole 10 - Sign Sewer Exit South 11 - Note ENTER AT YOUR OWN RISK 12 - Ratling Boss Upon entering this room you encounter a large number of ratlings with the Ratling Boss. By attacking the ratlings the boss also takes damage so deal with them first. Avoid the bosses cannonfire. It causes knockback. Drops: Handcannon. Pick up the Brass Key to leave this room again. 13 - Cheese, Potion of Resurrection 14 - Potion of Vitality 15 - Cannonball (1) 16 - Shoes 17 - Brass Key 18 - Leather Brigandine 19 - Skull 20 - Cheese (3), Note DO NOT DISTURB 21 - Pellets (10) 22 - Sign Sewer Exit West 23 - Meteor Shield Once you pick up the shield, the trickster appears and throws firebombs at you. He will drop Firebomb (1) and the Ornate Key, allowing you to open the southern door of this room. 24 - Ornate Keyhole Opening this door will open the walls across the sewers, containing Fire Elementals. 25 - Greater Healing Potion (1) 26 - Antivenom (1), Smoked Sea Bass 27 - Switch Opens the door on the right, allowing access back to where you came from. 28 - Scroll, pin puzzle Follow the leader What the scroll actually means is: jump down where the pin traps are moving, follow the needles and press the buttons along the way until you hear a door open. 29 - Power Gem 30 - Treasure Chest Requires lockpicks Contains: Blooddrop Cap (3), Burrow Rat Shank Not really worth the lockpick 31 - Secret Button (underwater) Opens the door at 32 32 - Sack Contains: Etherweed (2), Blooddrop Cap (2), Falconskyre (3), Mortar and Pestle. You should already have a mortar and pestle, but would be nice to have a backup when your alchemist gets injured in combat. 33 - Etherweed (1) 34 - Lockpicks (1) 35 - Healing Potion (1) 36 - Diviner's Cloak, Shaman's Staff 37 - Lightning Bomb (1) 38 - Leather Boots 39 - Passage This area of the map is only reachable by travelling underwater, the gate on the right is open. 40 - Crossbow Quarrel (1) 41 - Island Puzzle In order to solve this, you need to have the map that you got from the secret treasure you found at the eastern beach at the Hamlet. It draws the shape of the islands in the water in a certain order. Step onto the islands in the order that's indicated on the map, and the door to the northwest will open, allowing you open the treasure. 42 - Treasure Chest Contents: unknown yet. 43 - Switch Opens the door behind you 44 - Sack Contains: Poison Bomb (3), Potion of Vitality (1) 45 - Sewer Garden You may think it's odd that this sewer has a beautiful garden, but it does, the area is even very rich in fish and it quite quickly regenerates. So if you're ever hungry, you can come fishing here. But that's not the reason you're here... You're here because of what's behind the golden lock. 46 - Crystal Shield |
DonateIf you like our walkthroughs and want to support us to continue expanding this into more detail and perhaps other games, you can donate to us. We would greatly appreciate it. |